Build a Weather Live App
In this tutorial, you're going to create a live app that shows you the weather of a city using the OpenWeather API. You're going to edit the live app so you can change the city and update the weather from the Quip doc. This tutorial demonstrates how you can push and pull data from an external source.
In this tutorial, you will:
- Create a New Live App Project
- Add the OpenWeather API
- Retrieve the OpenWeather API Key
- Add Your Live App to a Quip Doc
- Change the City from the Quip Doc
- Deploy to Production
The sample code in this tutorial is in Typescript.
Create a New Live App Project
Let’s create a project and call it Weather.
-
In the terminal, change the directory to where you want to create this live app.
cd ~/<path-to-live-apps-folder> -
Initialize a new project.
quip-cli init -
Use the following customization parameters:
- For
What is the name of this app?, type “Weather”. - For all other parameters, select the default value by hitting Enter.
noteThe default language is TypeScript.
- For
-
Change directory to your new project.
cd weather-live-app
Add the OpenWeather API
Next, connect Weather to the OpenWeather API and make it show the weather of New York.
-
Install the Weather View package from the OpenWeather API inside your Weather live app project.
npm install --save weather-view -
Open the manifest.json file and add the following lines to connect to the data of the OpenWeather API and access its images.
    "csp_sources": {
        "connect_srcs": ["https://api.openweathermap.org/"],
        "img_srcs": ["https://openweathermap.org"]
} -
Open the /src/components/main.tsx file and add the Weather View dependency from the OpenWeather API to the top of the file.
import Weather from "weather-view"; -
Replace the
render()content with the following to display the weather of New York.render() {
return (
<div className={"root"}>
<Weather
apiKey={"YOUR-OPENWEATHERMAP-API-KEY"}
location={"New York"}
/>
</div>
);
}
Before you upload this code you must replace YOUR-OPENWEATHERMAP-API-KEY with your OpenWeather API key.
Retrieve the OpenWeather API Key
To get your OpenWeather API key, complete the following steps.
-
Go to https://openweathermap.org and create a free account.
-
Get the API key from one of these methods:
-
At https://home.openweathermap.org/, click API keys.
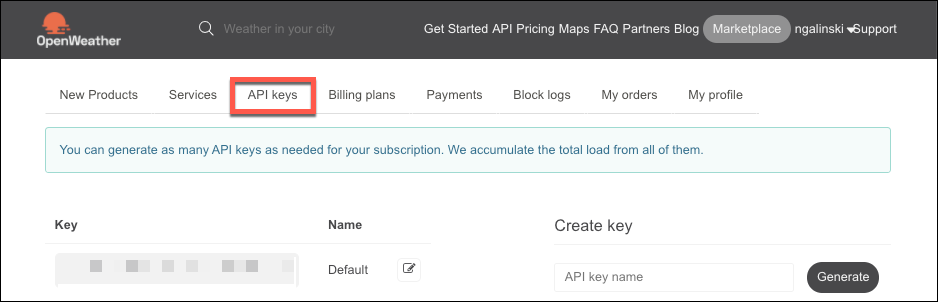
-
At https://openweathermap.org/, click your account and then MY API Keys.

-
-
Copy the API key.
-
Go back to the /src/components/main.tsx file and replace
YOUR-OPENWEATHERMAP-API-KEYwith this API key.
Release the Beta Version
Since you changed to the manifest.json file, you must publish and release a new version of Weather to see the changes in a Quip doc.
-
Bump the version to create a new version number.
quip-cli bump -
Build the project.
npm run build -
Publish the changes to the Quip server.
quip-cli publish -
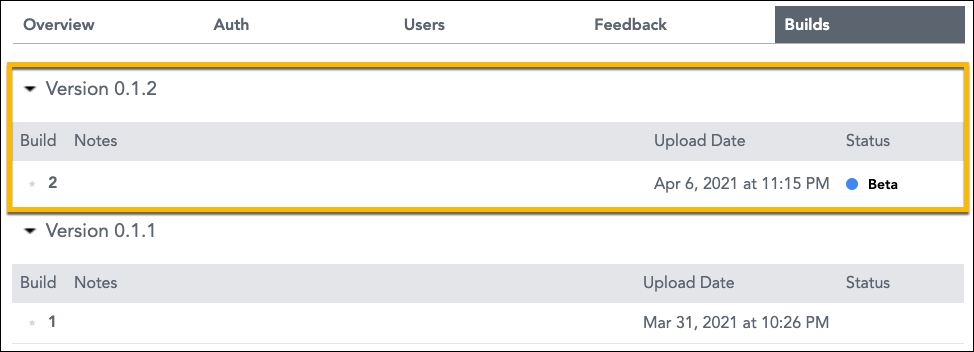
Go to the developer console and click the Weather tile.
-
Go to the Builds tab.
-
On version 0.1.2, click Beta Test | Deploy as Beta. The Status now says "Beta".
Add Your Live App to a Quip Doc
Let’s add Weather to a Quip doc.
- Go to the Quip site (salesforce.quip.com for Salesforce) and open a new Quip doc.
- In the Quip doc, add Weather by typing
@Weatherand then click Insert.
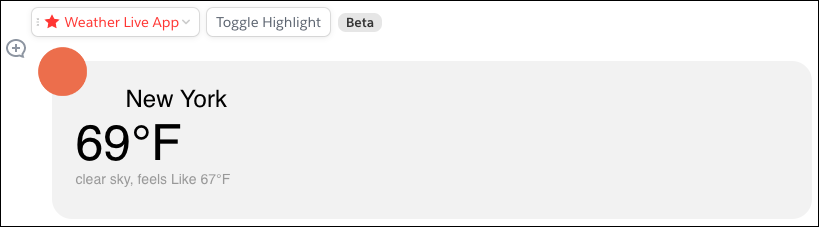
You can now see New York’s weather.
Change the City from the Quip Doc
Let’s modify the code so that you can change the city from the Quip doc and get the weather of the new city. You can view these changes on the local server before releasing the next version.
-
Start the local server in the command line inside your project.
npm start -
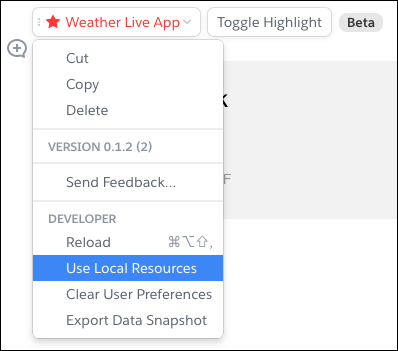
Go to the Quip doc and from the app’s dropdown menu select Use Local Resources | Enable.
-
In the /src/components/main.tsx file add a
locationvariable as follows.interface MainState {
//...//
location: string;
}
export default class Main extends Component<MainProps, MainState> {
//...//
constructor(props: MainProps) {
//...//
this.state = { data, location: "New York" };
}
//...//
} -
Replace the
render()method with the following. This adds an input box for the city name to the UI, pushes the city name to the OpenWeather API, and retrieves the weather of the new location.render() {
const { data, location } = this.state;
return (
<div className={"root"}>
<input
type="text"
value={location}
onChange={(e) => this.setState({ location: e.target.value })}
/>
<Weather
apiKey={"YOUR-OPENWEATHERMAP-API-KEY"}
location={location}
/>
</div>
);
} -
Go back to the Quip doc and from the app’s dropdown menu click Reload.
-
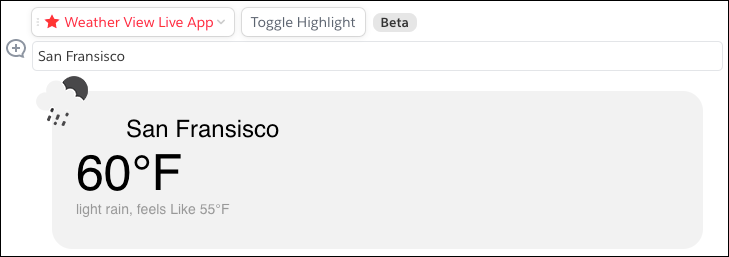
Change the city, for example, to San Francisco. The app automatically updates to show you the current weather of San Francisco.
Deploy to Production
Now, you’re ready to release Weather to production and make it available to other Quip users.
-
Stop running on the local server. In the terminal, press Ctrl + C to exit the
npm startprocess. -
Go to the Quip doc and, from the app’s dropdown menu, deselect Use Local Resources.
-
Bump the version. You can’t publish over an existing version, so you have to create a new version number.
quip-cli bump -
Build the project.
npm run build -
Publish the changes to the Quip server.
quip-cli publish -
Go to the developer console and click the Weather tile.
-
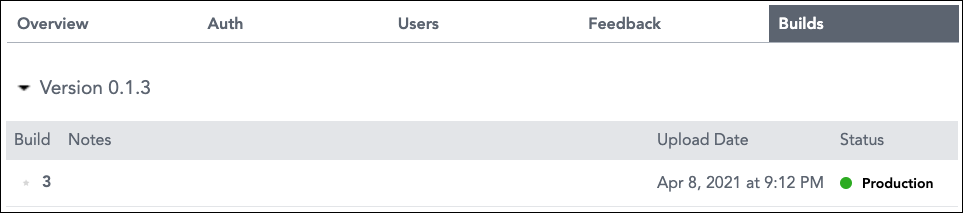
Go to the Builds tab.
-
On version 0.1.3, click Release | Deploy to Production.
That’s it! If you refresh the Quip doc, you're now viewing the production version of Weather that can display the weather of different cities.
Congratulations! You just deployed your live app to production. Bear in mind that you’re still the only one who can see the live app. Head over to the Install on Your Site section to find out how to make your live app visible to all Quip users on your site.